The idea of building a cheap water pump especially for the people in Africa keeps my mind busy since a while already. The idea to built a pump here in Belgium came to me on my visit at Arnica Hof. (More about Arnica Hof on my blog). The other reason is Charles from the Wereldwerf in Olen. He has a so called recyling wall where he stores everything others just throw in the bin. I gave Charles a call and told him about the pump. He was immediatly ok. I offered him to work a couple of days to finance my stay. He didn´t want me to work but I did it anyway. On the other hand it gave me the opportunity to meet Alex again. He was still at the Wereldwerf but about to leave.
 To start with the pump I needed an old car tyre and an empty barrel. The barrel will just be used instead of a borehole. With Charles´ help we had a tyre and a barrel within 30 min. Thanx to the Opel dealer in Heretals.
 The plan was to use only second hand material, either from the trash or recyceled or just something.
Ok, here is my working place. I used an old Black and Decker wood work bench.
 To start with the pump I needed a wheel. There was a blown up industrial hoover. A round one, perfect. I just cut a peace of maybe 100mm . To reinforce the hole thing I found some wooden plates. I cut two round pieces. The measurement was the inner diameter of the hoover. To make sure nothing will move I connected the two wooden wheels with some small pieces of a wooden batten.
The next step was the handle. I found some 12mm round steel. I thought I could drill a hole through the side parts of the wheel and connect the handle with some sheatmetal to the wheel. No sooner said than done.
But before I started to think about bearings and fixing I needed a stand for the wheel. I found some square profil timber. Luckily I was able to use Charles´wood work place with all it´s fantastic equipment. But the timber had almost the perfect size. I just had to cut one of them. With a few nails and a reinforcement the stand was done.
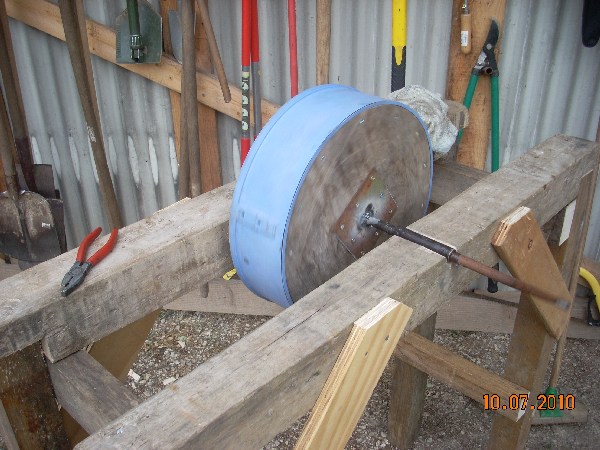 Now I could start to think about the bearing. There were some tubes a bit bigger then the steel for the handle, perfect. I cut 3 pieces each 100mm. I relieved the top timber in the size of the tube. Now I just had to slide the tube on to the handle put a bit of grease and I had my bearings. To fix the attachment to the handle I used a welding on the handle side and some screws (second hand as well) on the wheel side. To make sure the wheel is not moving sideways I welded a big washer on the end of the handle.
Afterwards I had a moving wheel already.

 The most important part of the pump is the so called guide box. This is the part which stays in the borehole. It should be heavy enough not to float and it carries two PVC pipes. One is the back running pipe and one is the actual pump pipe which builds up the watercolumn. They are both connected to the guide box. The guide box is actually nothing else than a box which is changing the direction of the pistons. I used a part of a wodden beam to connect the PVC tubes. And for the part where the pistons slide over I used an empty glasbottle filled with cement and fixed this on the bottom part of the beam. To have enough ground cleareace and enough weight I fitted two bricks to the beam and voila, guide box was done. The last part which had to be done were the pistons and the rope, and for sure fitting them in the pipes. I cut the pistons with an ordinary pair of scissors. I thought it might be a problem but no, the side of a tyre is very soft. The pistons should be 1mm smaller then the tube. Ok, it is not possible to cut an exactly round piston with a pair of scissors but it doesn´t matter.
 In the center of the pistons I drilled a hole a little bit smaler then the rope. I decided to put a piston every 60cm. I put the rope through the tubes and than fitted the pistons and secured them with a simple knop.
I placed the guide box with the rope into the barrel. I placed the barrel underneeth two scaffoldings and the stand with the wheel on top of it. I connected the rope to the wheel. The rope has to be tight. When everything was connected I put some water into the barrel. Yeah, and than the big moment...and it worked from the first minute, great.
If I would build a pump like this in Africa I would change the design on some parts. The PVC tube has to be thinner. It depends the depth of the borehole. But never bigger than 40mm, and with deeper boreholes even less. There should be one piston each meter, not more. For the guide box I would use a piece of PVC tube instead of the glasbottle and I would put everything in a form to make the guide box out of cement. The pistons I would secure with a washer underneeth to make sure they can´t slide over the knop. But the actuall principle is fine. With this design it would be possible to pump water from a depth until 60 meters. The pump could be connected to a irrigation system which is another thing which would be very easy to build. And the pump could be driven by solarenergy.
Watvh the video!!
!!!!!Important!!!!!
The pump is not my invention. These pumps exist already in Africa. The design is made by myself. I tried to build a very low cost pump. At the end the only new parts I used were nails, but only cause I couldn´t find second hand ones. All the rest is just trash or recycled material.
Let´s see if we can put something like this into action.
For more pictures click on the Link.
http://www.flickr.com/photos/constructafrica/sets/72157624538656602/